Introduction
The Ruger SP-101 is a great revolver, but the factory double action trigger pull can be heavy and a bit rough. It can be improved with a "trigger job". Improving the trigger pull involves disassembling the revolver, sanding / polishing surfaces, installing shims, and replacing factory springs with lighter springs. This guide will walk you through the process of completing a trigger job. The entire process is broken down into simple, illustrated steps.
Safety
Make sure the revolver is not loaded. Please follow all firearm safety rules while working on your firearm.
Warning
An improper trigger job can render a revolver useless or result in a dangerous malfunction. Several parts in the revolver are carefully fitted at the factory. Any significant changes to these parts can make the trigger pull worse or render the revolver useless.
When sanding, your goal is to smooth the rough spots while removing as little metal as possible. The surfaces do not need to be perfectly flat and smooth. You should only use 1000 - 2000 grit sandpaper and polishing compound. Using courser sandpaper can easily remove too much metal. Do not sand the forcing cone, cylinder face, cylinder notches, cylinder crane (or the frame where it meets the crane) or any other surface unless you're sure it will not effect the proper function of the revolver. Avoid using a Dremel or any power tools, except with soft polishing wheels and polishing compound.
Although it will significantly increase the amount of time to complete a trigger job, I recommend that you reassemble and test the revolver after sanding and polishing each part.
Contact
Please feel free to email me at: kevin@kevinsworkbench.com if you have any questions or suggestions.
Disclaimer
The procedures in this guide can render your revolver inoperable or result in a dangerous malfunction. I am not a gunsmith. I am not responsible if you break something or injure someone.
© 2011-2015 by Kevin Wilson
gab
A social network that champions free speech, individual liberty and the free flow of information online. All are welcome.
Sign Up Now
Telegram
A new era of messaging
Sign Up Now
Preparation
If you plan to install shims, measure the gap between each side of the hammer and trigger before you begin disassembly (see below). Have several small cups, bags, etc. to put the parts in as you disassemble the revolver. I find it helpful to label the parts during disassembly. I recommend having a clean work area with good lighting and minimum distractions.
Required Materials
Actually, some if the following items are required. Others are helpful or optional:
- Long, thin screwdriver, bar, etc.
- 1 or 2 paper clips
- Sandpaper (1000, 2000 grit)
- Polishing compound
- Soft cloth or rotary tool
- Replacement springs
- Feeler gauge
- 1/4" drill bit
- Vise (with padding)
- Fork (silverware)
- Oil
- Large, clear plastic bag (about 1 gal size)
- Several small cups or plastic bags
Shims
Hammer shims and trigger shims will center the hammer and trigger in the frame and prevent dragging. Use the following procedure to determine the required shim thickness for your revolver.
With the revolver fully assembled, use a feeler gauge to measure the gap between each side of the hammer or trigger and the frame. Add the gaps on each side to calculate the total gap. Subtract 0.002 inches from the total gap. Divide the result by 2 to determine the thickness of each shim. For example: if each side of the hammer has a 0.004 inch gap, the total gap for both sides will be 0.008 inch. Subtract 0.002 inches = 0.006 and divide by 2 = 0.003 inch. So the hammer should have a 0.003 inch shim on each side.
High quality stainless steel shims can be bought from Lance at TriggerShims.com. He also has an eBay store under the seller name "Michigan Center Outdoors". Lance produces all his shims by hand.
You can also make your own shims from a feeler gauge. Cut off the end of the gauge and drill or punch a hole slightly larger than the pin that'll go in the hole. To drill a cleaner hole you should place some wood under the shim. You may also clamp the shim between two pieces of hardwood, aluminum, etc. A step drill usually makes a better hole. If the drill bit is wandering, make a small dent in the center of your future hole with a center punch or nail before drilling. The edges of the shim should be sanded smooth.
The steel in many feeler gauges will rust easily. Be sure to apply a coating of oil or grease to the shim. Getting the shims in place while assembling the revolver can be a challenge. I recommend inserting the shim between the parts and using a feeler gauge to push the shim into place, then use a paper clip to align all the holes so the pivot pin can be inserted.
Schematic
You may refer to the following schematic through the trigger job process.
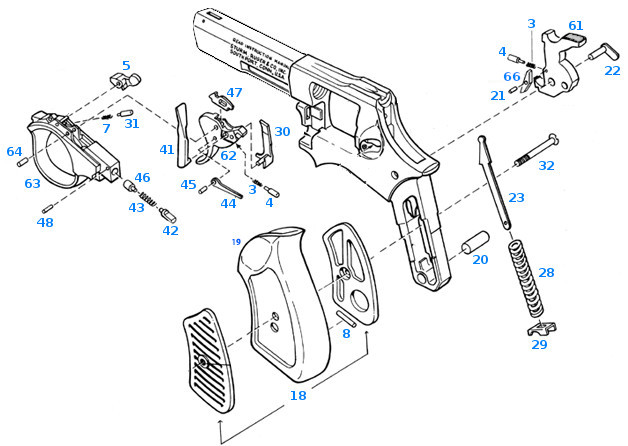
| Part # | Description |
|---|---|
| 3 | Hammer dog spring, pawl spring |
| 4 | Plunger |
| 5 | Cylinder latch |
| 7 | Cylinder latch spring |
| 8 | Disassembly pin |
| 18 | Grip panels |
| 19 | Grip |
| 20 | Grip retaining pin |
| 21 | Hammer dog pivot pin |
| 22 | Hammer pivot pin |
| 23 | Hammer strut |
| 28 | Mainspring |
| 29 | Mainspring seat |
| 30 | Pawl |
| 31 | Pawl plunger |
| Part # | Description |
|---|---|
| 32 | Grip panel screw |
| 41 | Transfer bar |
| 42 | Trigger guard latch |
| 43 | Trigger guard latch spring |
| 44 | Trigger link |
| 45 | Trigger link pin |
| 46 | Trigger link plunger |
| 47 | Trigger plunger |
| 48 | Trigger guard latch retaining pin |
| 61 | Hammer |
| 62 | Trigger |
| 63 | Trigger guard housing |
| 64 | Trigger retaining pin |
| 66 | Hammer dog |