How To Polish Stainless Steel
by Kevin Wilson
This is a very brief and basic introduction to polishing stainless (or other) steels.
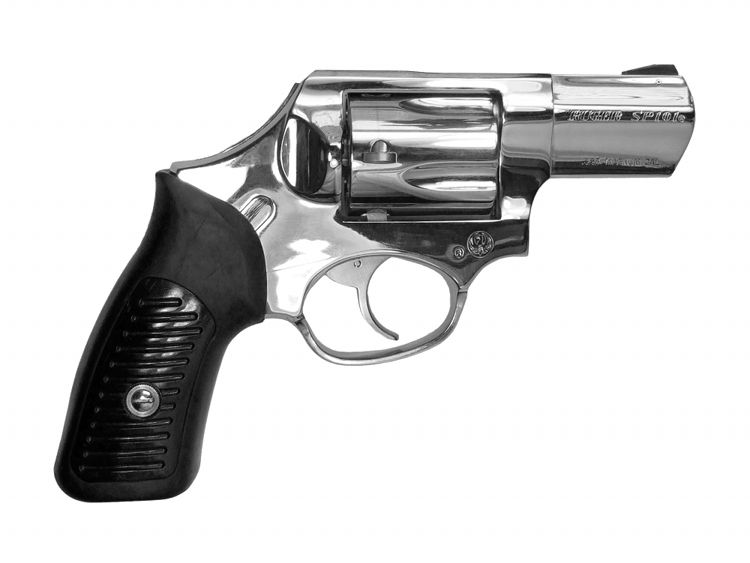
There are many methods and techniques used to polish stainless steel including sanding, buffing, electropolishing, etc. I'll cover the use of sandpaper and polishing compound. I'll use a Ruger SP-101 revolver as an example of something you may want to polish.
Why would someone polish steel? A polished finish is a little more rust resistant, it may add value and I personally think a nice polished finish can look much better than matte finish. However, a polished finish will require some periodic maintenance as the surface becomes scuffed and scratched from normal wear. It also shows oil and fingerprints.
The surface of some steel may undergo a passivation process that removes iron or creates a thin oxide layer to help prevent rust. Sanding and polishing will remove the surface layer. I don't know if Ruger uses a passivation process, but after sanding and polishing my Ruger SP-101 I have not experienced any issues with rust or staining. I recommend keeping a thin layer of oil on all surfaces to help prevent rust.
Warning
Some surfaces on a revolver should not be sanded. These surfaces directly contact other surfaces or are specific distances from other surfaces. Sanding these surfaces can cause a revolver to malfunction. These surfaces include the cylinder face, cylinder notches, the forcing cone, the surface on the cylinder crane that mates with the frame, the surface of the hammer that contacts the frame, etc.
Do not use steel wool. Little pieces can stick in the surface and quickly rust. Do not use a Dremel with sanding or grinding bits - only use a Dremel with soft polishing wheels.
Disclaimer
I'm not a metal polishing expert. I'm not responsible for any damage caused by the techniques or information presented in this article.
Required Items
Some of these items are required, others are helpful.
- Sandpaper in 400, 600, 1000, 1500 and 2000 grit (I recommend wet/dry automotive type)
- Polishing compound
- High speed rotary tool with polishing wheels
- Hand drill, grinder, etc. with buffing wheel

Procedure
A unpolished surface is actually covered in many tiny scratches of various depths. Polishing will evenly remove metal from the surface down to the bottom of the deepest scratches. Since you cannot fill in the scratches, removing metal around the scratches is the only way to create a smooth, polished surface finish. Paradoxically, the process of smoothing a surface requires scratching it.
You'll use sandpaper to scratch away a thin layer of metal from the surface. The layer of metal removed from the surface must be sufficiently deep to reach the bottom of all existing scratches. Start with the coarsest grit. It will produce the deepest scratches and remove metal from the surface quicker than finer grits. When the scratches made by the sandpaper have reached the same depth as the original scratches, move up the next finer grit sandpaper. The surface should have an even finish. Make absolutely sure all the original scratches are removed before proceeding to the next grit, it's the only way to create a uniform finish. You may be tempted to move on and remove a particularly deep or stubborn scratch with the next grit, but that scratch will be much more difficult to remove with the next finer grit. Polishing can be a time consuming process, but patience is absolutely necessary.
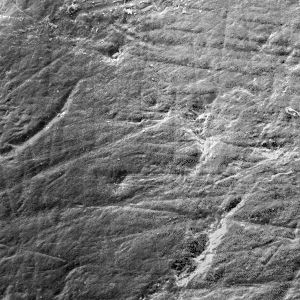
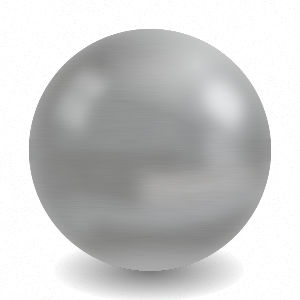
An unpolished surface will look something like the images shown here. The surface is rough with many scratches in various depths and directions. There may also be some pitting on the surface. Start by judging the depth of the existing scratches to determine what grit to start with. This will take some experience. If you're not sure, just start with your lowest grit sandpaper, probably about 400 grit. I prefer to add a little oil to the surface. Sand the entire surface evenly until all existing scratches are gone. I prefer to use a circular motion with light pressure and finish with straight strokes in the same direction. Sanding perpendicular to the previous grit will help you see when all the previous scratches are gone. Generally when moving to a higher grit, the grit should be doubled (600 to 1000 to 2000). However, I prefer to increase the grit by about 50% (1000 to 1500 to 2000).
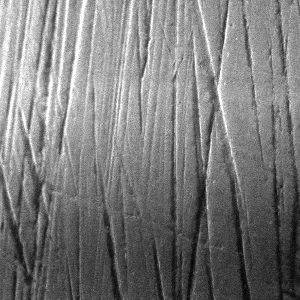
After finishing with the course sandpaper the surface will be scratched, but the scratches should all be about the same depth and direction. As you sand, especially with higher grits, your sandpaper will "load up" or build up a layer of metal dust and grit. The build up will fill the areas between the grit and reduce the effectiveness and depth of the scratches created by the sandpaper. This effectively increases the grit of your sandpaper. When I'm nearing completion of a level of grit, I prefer to let the sandpaper load up to create a smoother finish.
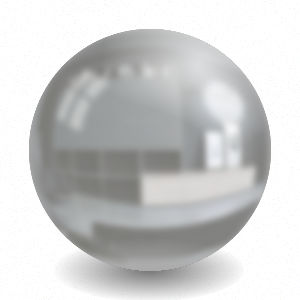
If a scratch refuses to sand out, you can drop back to a lower grit, sand out the scratch, then go back to the higher grit. As you progress to finer grits, the surface will begin to increase it's reflectiveness. As you complete 1500, 2000 grit the surface should be hazy without any scratches. At this point you're ready for polishing compound.


Apply a very thin layer of polishing compound to the surface of the metal. Start with the tighter woven wheels and buff the entire surface a few times. Next switch to the looser wheels and repeat the process. An assortment of different wheels will make it easier to polish tight areas. I like to cut a cotton swab in half and use it in my rotary tool to polish the hard to reach areas. After buffing you should have a mirror shine. If you find a scratch or a dull spot then you'll need to go back to the fine grit sandpaper and sand them out. Often the tighter wheels will leave swirl marks. These can be polished out with a loose wheel or by hand with a soft cloth.
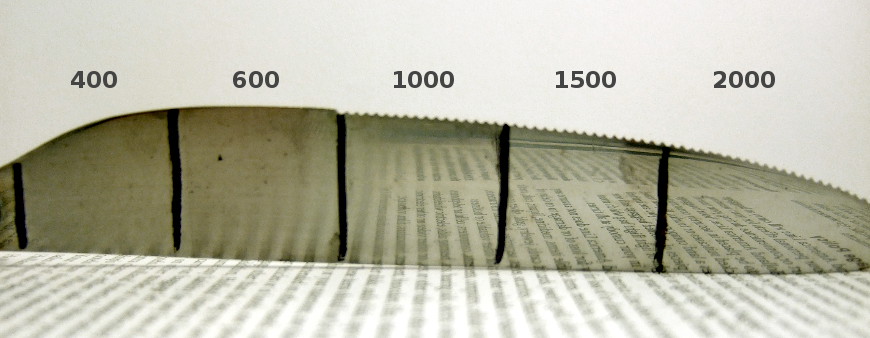
In the image above you can compare the finish of different grits. This is a kitchen knife (don't tell my wife) sanded with wet / dry automotive sandpaper. There isn't much difference between 400 and 600 grit. There is a definite change when moving up to 1000 grit. A small improvement is made when moving up to 1500 grit. However, there isn't much difference between 1500 and 2000 grit. Based on this simple test it's advisable to progress from 400/600, 1000, then finish with 1500/2000 grit. You can also see that 2000 grit produces almost a mirror finish. Depending on your requirements, this may be good enough. If you'd like a better finish, you'll need to move up to polishing compound.
Please feel free to email me at moc.liamg@paMalseT if you have any questions or suggestions.
You may also be interested in my Ruger SP-101 Disassembly and Trigger Job Guide.